192.168.0.1 is the default gateway address of many routers such as TP-link, D-link and Netgear. 192.168.0.1 is also the admin panel that can be logged in to configure router’s basic and advanced settings.
How to Login to 192.168.0.1?
To log in to 192.168.0.1 admin page, follow the steps:
- Check whether your device and router is connected to internet.
- Open a web browser and make sure there is no proxy configured.
- Enter 192.168.0.1 at the address bar or click http://192.168.0.1
- A login page will show up.
- Enter username and password, most common username are: “admin, root, administrator, user”, and most common password are:”admin, password, 123456, user, root”.
- You will be logged in the admin panel if the login credentials are right.
Note: Make sure you are entering the correct IP address, don’t mix it with misspelled 192.168.o.1 or use ‘www’ ‘https’ at the beginning of the URL, there’s no alphabets in an IP address except numerical digits.
How to change router’s SSID and password?
Once logged in to router, you are able to change the settings, including modifying SSID(also called Network name), WiFi password or WiFi channel, which are very important to secure your WiFi network and information. Many people think network name doesn’t matter, but it might reveal your personal information. Here are some basic steps to change WiFi SSID and password.
Change Network Name(SSID):
- Enter router’s IP address into your web browser, such as 192.168.0.1 or 192.168.1.1.
- Login to admin panel using router login username and password(which is different from WiFi password).
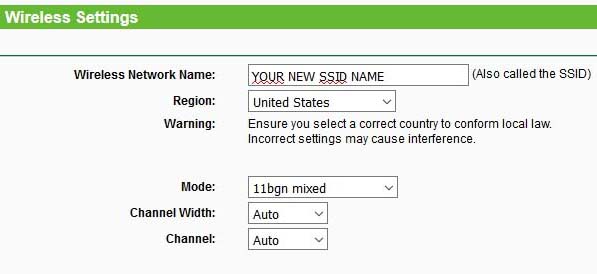
- Select Wireless and locate Wireless Settings.
- Enter your preferred name in Wireless Network Name section(SSID).
- Click Save to apply changes.
Change WiFi Password:
The security of your WiFi network depends on the strength of your WiFi password. Although it’s convenient to choose a simple password that’s easy to remember, security always takes precedence over convenience. So choosing a strong password will keep hackers away from your network.
- Open a browser and enter http://192.168.0.1 in the address bar.
- Type username and password in the login admin page, if you don’t know them, try default username and password admin/admin or admin/password.
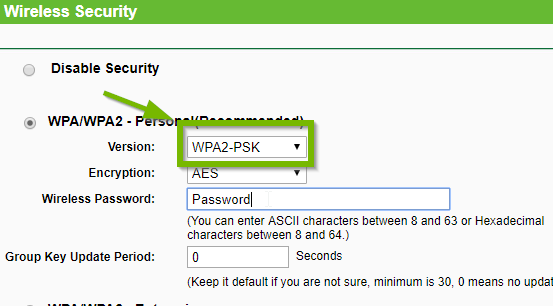
- Select Wireless and click Wireless Security.
- Turn on “WPA/WPA2” if it’s not, then enter a strong password.
- Click Save to apply changes.
Most router will reboot automatically to save the settings, so your device will disconnect from your WiFi, after the reboot, try to connect WiFi with the new password.
Can not access 192.168.0.1
If your device can’t access 192.168.0.1 or one of your devices isn’t able to access this IP, then there are some reasons you might encounter:
- Router IP address configuration error.
- Forgot to turn on wireless switch on your laptop.
- Wireless channel mismatch.
- Your browser is configured with a proxy.
The solutions to above problems are pretty easy:
- Set your router to DHCP mode, and make your computer to obtain IP address automatically.
- Turn on wireless switch and ‘WLAN AutoConfig’ service in your computer.
- Some old computers may only support WEP encryption, change WiFi security option from WPA/WPA2 to WEP would solve this problem.
- Clear your browser’s proxy setting and browsing data, or clear cookies, then try again.
Sometimes if you can’t access 192.168.0.1, there might be some inexplicable reasons, it may be your computer configuration is wrong, or because the wireless router configuration is incompatible, you’ve misspelled it as 192.168.o.1. The easiest way to these problems is to make all your personal settings to default settings, such as factory reset your router and clear your computer’s personal data.


