192.168.1.1 is a private IP address used to login to the admin page of most routers. 192.168.1.1 is usually specified as the default gateway by the router companies, and it can also be used to make changes to router settings and configurations.
How to Login to 192.168.1.1?
To login to 192.168.1.1 of your router, follow the steps below:
- Open a browser and type http://192.168.1.1 or enter 192.168.1.1 into the address bar
- The router will pop up a panel asking you to enter login username and password.
- Type the username and password in the relating fields.
- Then it will show the admin page of the router if the username and password are correct.
Note: Please make sure you’ve entered the right address 192.168.1.1, there are many different IP addresses like 192.168.0.1 or 10.0.0.1.
Forgot Login IP Address Username and Password?
If you forgot router’s login IP address or username and password, or if they don’t work then you can check the steps below:
- Look at the back of the router, the information is always printed on a label.
- Find them on router’s manual or package box, or check this default username and password list.
- Use your computer to get router’s IP address,
- If you changed the password before and have lost it or forgotten it, you need to reset the router to factory settings. To do so, find the hidden reset button on the back or top of the router, press and hold the button for 15 seconds, the router will reset to factory settings.
How to change router IP Address?
Router’s default gateway IP address can be changed to avoid IP address conflicts if you have more than one device in the same LAN. Hackers can easily use it and result in malicious attacks such as DNS hijacking and DDoS attacks. However, users can modify it and prevent others from tampering with internet information. Here’s how to do it:
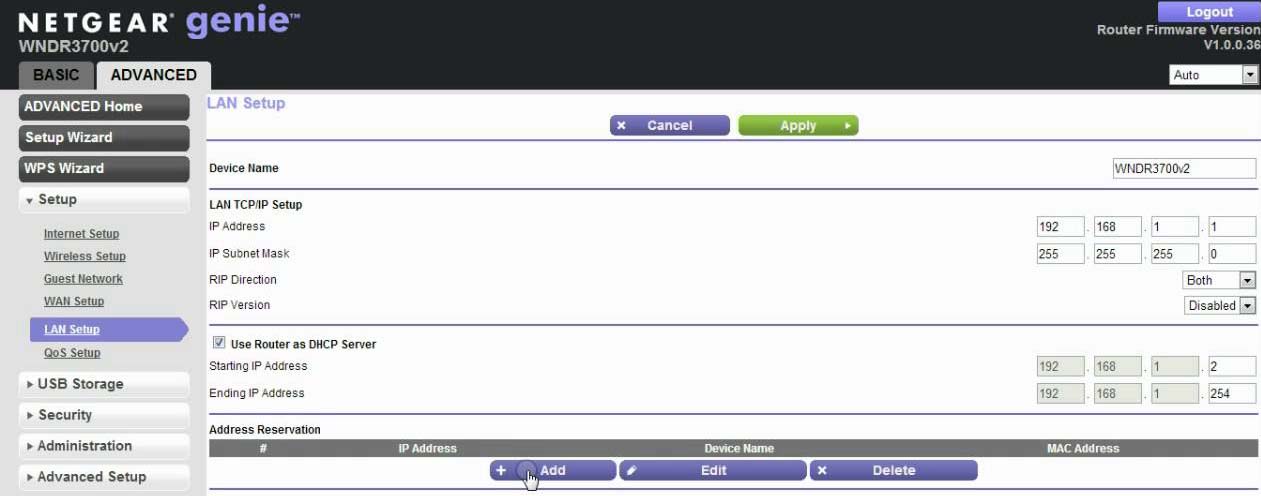
NETGEAR:
- Login to your NetGear router’s admin panel via 192.168.1.1 or http://www.routerlogin.com or http://www.routerlogin.net.
- Type username and password at the login box, by default, they are admin and password.
- As soon as logged in, click ‘Advanced’ menu, look at left menus, then click ‘Setup’ > LAN Setup.
- In the ‘LAN TCP/IP Setup’ section, change 10.10.10.1 as what you prefer.

- Click ‘Apply’, the router will reboot and save settings.
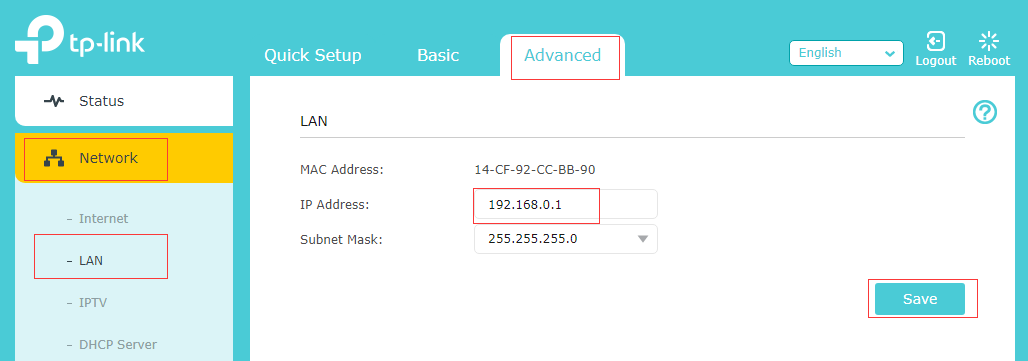
TP-Link:
- Login to TP-Link’s default gateway address 192.168.0.1 or 192.168.1.1, username and password are both admin.
- Go to ‘Adcanced’ menu, then ‘Network’ > ‘LAN’.
- In the IP Address field you can change it to others such as 192.168.2.1.

- Save the setting and reboot the router to apply the changes.
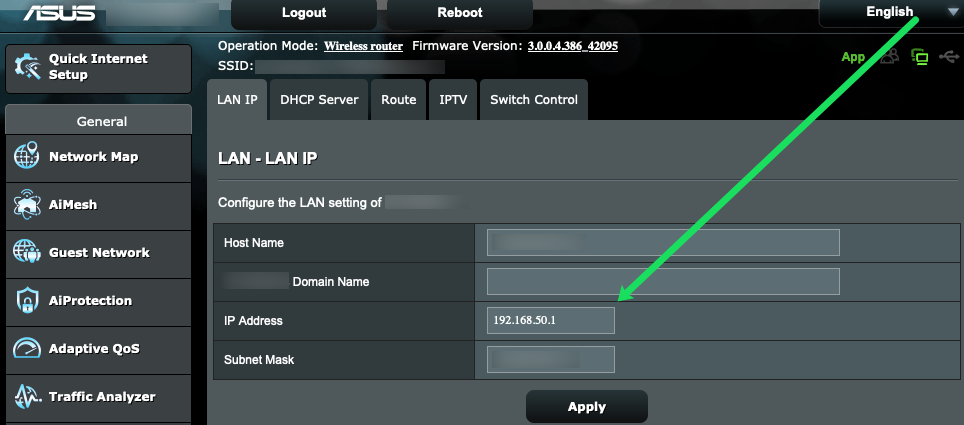
ASUS:
- Login to your router’s setting page at 192.168.1.1(most of ASUS router’s username and password are: admin)
- Navigate to Advanced Settings, then go to LAN, click LAN IP.
- Enter your favored IP address.

- Click Apply to save settings.
If there is anything wrong during the process or you want to clear all the data in your router, you may reset router to factory settings to restore default configurations.
Many homes and businesses use and rely on WiFi networks, it is very important to ensure the security of WiFi network. Follow the basic guide to effectively protect it, such as setting up strong login password, enabling WPA2 encryption instead of WEP(WEP is and outdated and security flawed protocol), hiding network name SSID, disable Remote Access and WPS, and keep the firmware up to date.